EcoSwitch Plus UK
Contents
• Introduction
• Installing the EcoSwitch UK
• Getting started with the EcoSwitch
• Access the EcoSwitch web interface
• The EcoSwitch Energy Planner
• Switch the EcoSwitch on and off manually
• Change the network name of the EcoSwitch after installation
• Change the EcoSwitch device name
• Change the login credentials of the EcoSwitch
• Install a new version of the firmware
• Using the EcoSwitch Energy Planner
• Configure Energy planning based on price data
• Random Variations in the Planning
• Configuring time blocks
• Electrical power price data
• Information Pages
• Events
• Energy Use
• Problem Solving
• Using the optional Ecosoft Energy App
Introduction
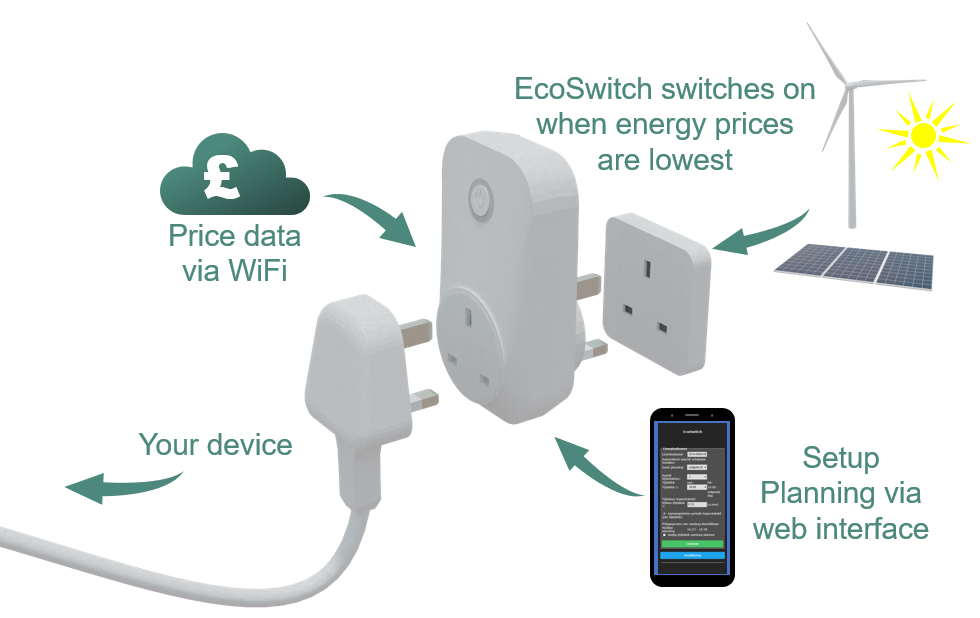
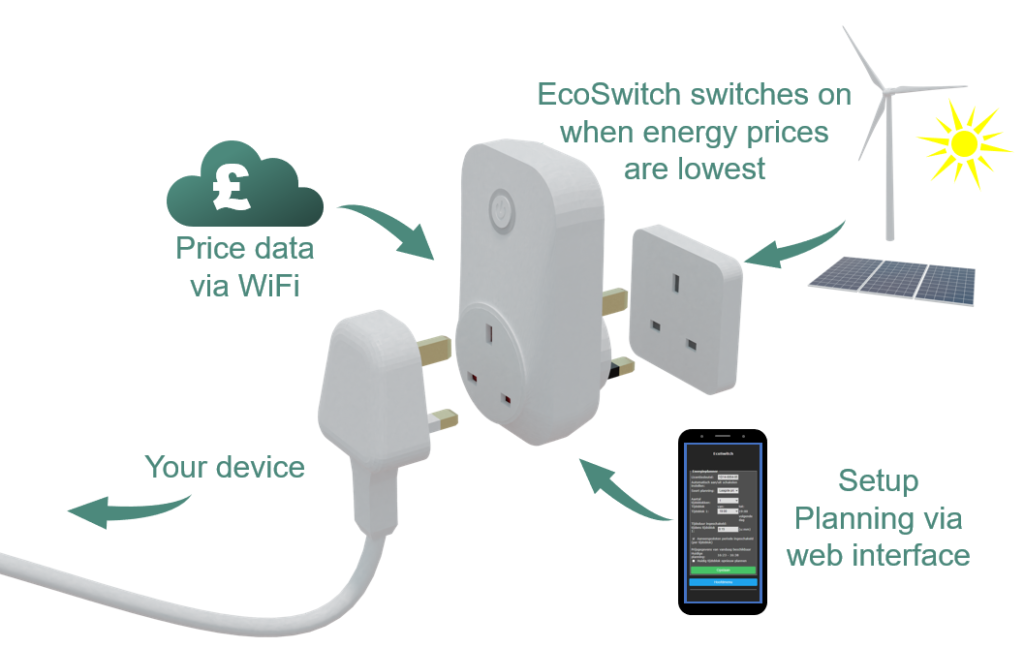
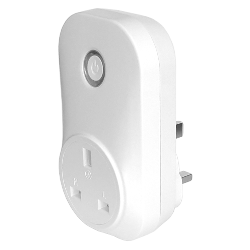
The EcoSwitch UK is a switch you can plug into the wall outlet. Plug the cable of your electrical device into the switch.
The EcoSwitch fetches energy prices via WiFi from the internet and switches on when the price is lowest. In the web interface you can create a schedule, which determines during which hours (and for how long) the EcoSwitch is allowed to be switched on. The EcoSwitch will then calculate a plan that suits your needs.
You can use this switch for, among others:
• Electrical boilers
• Close-in boilers (kitchen boilers)
• Electrical vehicles and PHEV’s
• Waterbeds
• Swimming pools
• Aquaria
Why is the EcoSwitch useful?
Even without reducing your energy consumption, you can reduce greenhouse gas emission if you choose the best moment to use energy. If your have a flexible contract with your energy supplier (when pricing depends on the hour of the day you are consuming energy), you will not only protect the environment, you will save money as well.
At certain times during the day, there is more electrical power available from sustainable energy sources, for example solar panels and wind turbines. This results in less CO2 emissions per kilowatt hour. If you consume power during those hours, the environment will be taxed less.
Installing the EcoSwitch
After installation, EcoSwitch can access the internet via your WiFi network to fetch the current electrical power price data.
• On your smartphone, temporarily turn off mobile data before you start the installation procedure.
• If installation does not succeed using an Apple device (iPhone or iPad), you can try using an Android device instead. After a successful installation using Android, you can use your Apple device to reach the EcoSwitch.
The procedure to install the EcoSwitch is this:
• Plug the EcoSwitch into the wall socket.
When you start using the EcoSwitch for the first time, it will automatically become a WiFi Access Point. If you want to make the EcoSwitch a WiFi Access Point at any given moment, then do the following:
• Press the ON/OFF-button (quickly) 6 times. The EcoSwitch will become a temporary WiFi Access Point.
You can perform the next steps of the installation on your mobile phone:
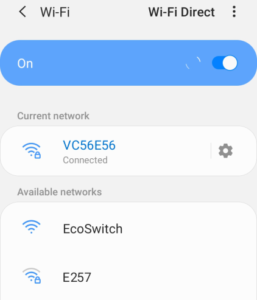
- On your phone, go to the WiFi settings and search for new networks.
- Connect to the network called “EcoSwitch”. It may take a few seconds up to a couple of minutes before this network appears in the list. Otherwise, restart the procedure (click the ON/OFF-button 6 times).
- In the browser on your phone, go to http://192.168.4.1. This is a temporary address; after configuration the EcoSwitch will no longer be reachable at this address.
- When prompted to log on, use these credentials:
Username = eco
Password = power - The EcoSwitch shows a list of detected WiFi networks. Select your own WiFi network.
- The EcoSwitch shows a list of detected WiFi networks. Select your own WiFi network and fill in the WiFi password that belongs to your WiFi network.
- Optionally, choose a hostname for the EcoSwitch in the network. The default name is “EcoSwitch”. If you have more than one EcoSwitch devices in your network, it is important to give each of them a unique name. This name you can use later to access the switch via the browser. If the name remains “EcoSwitch”, the switch will be accessible via http://ecoswitch.local.
Note: It is not possible to use space or special characters (except the minus sign -) in this name. - Press Save.
- It might take a minute before the EcoSwitch establishes a connection to your WiFi network. When a connection is successfully made, the browser will show you the new IP address that your network has assigned to the EcoSwitch, for example a phrase like “Redirecting to new IP address 192.168.1.7”. Within a few seconds, the browser will open this address.
- Your phone should be reconnected to your own WiFi network; generally this will happen automatically. If the EcoSwitch prompts you to log on again, fill in eco and power, as you did previously.
- Maybe the browser cannot establish a connection to the new IP address. Wait a few seconds and try to reload the page. Even after a failed attempt to connect, the browser will probably show the new IP address in the address bar. Use this new IP address to access the EcoSwitch, or use a .local address like (in this example) http://ecoswitch.local.

![]()
When the connection is established, your phone may warn you that internet is not available. This is normal; choose to keep the WiFi connection.

The web page shows:
– WiFi network edit box
– WiFi password edit box
– Hostname edit box
– Save button
– Other buttons (for configuration and reboot)
On any device supporting mDNS, for example your PC, you can use a .local address to access the EcoSwitch.
Getting started with the EcoSwitch
Access the EcoSwitch web interface
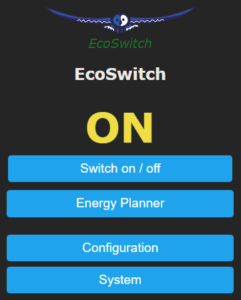
The EcoSwitch is accessible via the assigned IP address or – if your phone supports mDNS – via the hostname of the switch (e.g. http://ecoswitch.local). The IP address may change if your WiFi network assigns another IP address to the switch, for example when the switch has been disconnected from the outlet for some time, and reboots. The hostname however will remain the same, and might be more convenient to use.
When opening the web interface, you will be prompted to log on. The default credentials are:
Username: eco
Password: power
If you change the password, don’t forget it, or store it somewhere. Without the correct password it is not possible to access the web interface of the EcoSwitch. Hold the button on the EcoSwitch for 40 seconds to reset the WiFi settings and the EcoSwitch password.
The EcoSwitch Energy Planner
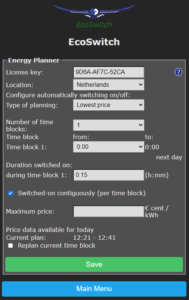
Energy Planning means that the lowest-priced energy will be used during a time block. This time block is specified by start-time and end-time. For example, if the time block is 12 hours and you need energy for 4 hours, the EcoSwitch will be switched on during the cheapest 4 hours within the 12-hour time block.
The EcoSwitch fetches energy price data from our server to determine when consuming power is cheapest. Based on this information the EcoSwitch schedules when to switch on, for example at 12 o’clock.
In the chapter EcoSwitch Energy Planner you can read how to configure it according to your wishes.
Switch the EcoSwitch on and off manually
You can switch the EcoSwitch on and off manually.
Procedure A (in the web interface):
● Log on to the web interface
● The web interface will show if the switch is turned on or not
● Press “Switch on / off” to manually turn the electrical power on or off.

Procedure B (on the device):
● The led of the switch indicates if it’s switched on or off.
● Click once on the ![]() button on the device to switch it on or off.
button on the device to switch it on or off.
After manually switching the device on or off, the switch will remain in that state (on or off) until the next automatic switching event performed by the built-in Energy Planner.
Change the network name of the EcoSwitch after installation
The network name will determine at which address you can access the switch via a browser.
● Go to the web interface
● Press Configuration
● Press Configure WiFi
● Fill in another Hostname.
● Press Save
Change the EcoSwitch device name
In addition to changing the network name (see previous) you can also change the device name. The device name will be shown at the top of the web interface.
● Press Configure
● Press Configure Other
● Adjust the Device name. Unlike the network name, this device name may contain spaces.
● Press Save
Change the login credentials of the EcoSwitch
It is recommended to change the default password (power) of the web interface. It is not possible to change the username (eco).
● Press Configuration
● Press Configure Other
● Adjust the Web Admin Password. If you want to make the password visible, tick the checkbox.
● Press Save
If you change the password, don’t forget it, or store it somewhere. Without the correct password it is not possible to access the web interface of the EcoSwitch. Hold the button on the EcoSwitch for 40 seconds to reset the WiFi settings and the EcoSwitch password.
Install a new version of the firmware
● Go to the web interface of the EcoSwitch
● Press System
● Press Firmware Upgrade
● At “Upgrade by file upload”, choose the file containing the new version
● Press Start Upgrade.
Using the Energy Planner
Configure the Energy Planner based on price data
● Go to the web interface of the EcoSwitch
Note: You can use names like “my_kitchen_ecoswitch.local”, but .local names will only work from phones and PCs supporting mDNS. If this name doesn’t give you access, use the IP address of the switch instead.
● Press Energy Planner

● Fill in the license key if this has not been done already.
● At Location, fill in the region or country where the EcoSwitch is located.
● Set Type of Planning to Lowest Price

● Choose the parameters that suit your energy needs. How to do this will be explained below.
● Press Save
Number of time blocks: Do you want to switch on the EcoSwitch 1x per 24 hours? Leave the number of time blocks at 1. If you want to switch more often during a day, see the section “Configuring Time blocks”.

You can set the length of every time block in minutes. The time blocks add up to exactly 24 hours. For every time block, you can set how long the EcoSwitch should be switch on during that time block: this is the so-called “Duration switched on during time block”.
Duration switched on: Here you can fill in how long the electrical power must be switched on during a time block. For example, if your car’s battery needs a maximum of 4 hours to charge, fill in 4. Then EcoSwitch will (within the time block) switch on power for 4 hours. During the rest of the time (during the time block) the power will be switched off. The power will be switched on during the cheapest hours, based on the available energy price data.
You can fill in the duration in hours or in the format h:mm. For example, if you need one and a half hour of power, fill in 1:30. Fill in 0:15 for a quarter of an hour.

Do not switch off when the device is still in use:
This option only applies to the EcoSwitch Plus
When it is uncertain for how long electrical power should be supplied to a device, this option can prevent that a device is switched off too early. For example, if a device must be switched on for 2 hours, according to the setup, but after 2 hours it is still consuming energy (for example a laundry machine that is still running), the EcoSwitch will not be switched off when you use this option. The EcoSwitch will only switch off when it has detected that connected device has stopped. To detect of this has happened, the EcoSwitch Plus measures the consumed power.
Apart from that, while a device is running, there are sometimes episodes of very low power consumption. During these episodes it should not be switched off. So, the EcoSwitch will consider a device as “not running” if the power is lower than a certain value (in Watts) during a certain time span (in minutes). You can configure these two values as shown below.

Automatic determination of “Duration switched on”:
This option only applies to the EcoSwitch Plus

When this option is enabled, the EcoSwitch Plus will measure how long a device has been used during a time block. Based on that, the EcoSwitch will (for the same time block) adjust the “Duration switched on” automatically to a new value. This is the expected duration that is necessary in the future. This new duration will be applied when the next planning is made (for the same time block). The duration can only be measured after the time block has been completed and there haven’t been any changes made to the settings in the mean time. This option is only available when the option “Do not switch off when the device is still in use” is enabled.
Switched-on contiguously (per time block): Prices may vary within a time block, and to benefit from this EcoSwitch may turn on and off multiple times during the time block. This is not always desired, and therefore this option is available. Enable the setting by checking the box.

This may be necessary for your electrical device to work properly. For example, a washing machine probably can’t handle a switch-off during the washing process. For this kind of electrical appliances it is necessary to plan a contiguous period in which power is supplied. In such cases, the option has to be enabled by checking the box.
On the other hand, heating a waterbed or the charging a battery may work fine if power is supplied with one or more breaks in between.
If power is not necessarily supplied contiguously, you can benefit more lower energy prices.
So, if your electrical devices can handle it, it might be good to leave this option disabled.
Maximum price: If you don’t want to pay more for electrical energy than a certain amount of money, fill in this amount in the “Maximum price” edit box. The EcoSwitch compares the electrical energy price of a specific hour, exclusive of VAT and other surcharges, to the amount you fill in here. The amount should be in Eurocents per kilo watt hour. For example, if you fill in 25, the EcoSwitch will be switched off if the price is more than 25 eurocents per kWh. The consequence of this setting can be that the switch is not switched on at all during a certain time block.

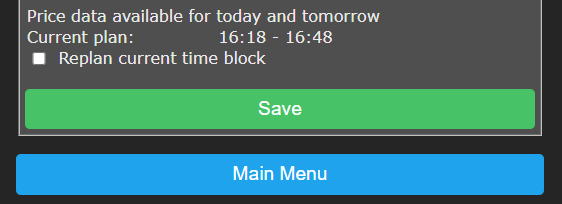
Replan current time block: If a plan has been made for the current time block, the Energy Planner page will show the start time and end time of the current plan. If you want to replace this plan by a new one (for example because you just changed the settings) check the box at “Replan current time block”. In that case, the EcoSwitch will create a new plan for the current time block, if you press the Save button to apply the changes. The duration you specified for the current time block is leading: if the remaining time within the current time block is large enough, the EcoSwitch will be switch on during the full duration you specified.

Random variation in the planning
The EcoSwitch planner will add (or subtract) a random variation of a few minutes to the start times and end times of the plan. As a result, electrical power will be consumed a little earlier or later. This is to prevent the switch to behave too predictable, and a number of switches to switch too synchronously.
Configuring time blocks
On default there is one time block of 24 hours, from 0:00 to 0:00 the next day. In many occasions, one time block is enough. If you’re satisfied with that, you can skip configuring time blocks.
Example: charging the battery of an electric car
Assume you want to charge the battery of your electric vehicle, at home. You arrive before 19:00h and leave the next day after 6:00h. The charging therefore should take place between 19:00 and 6:00.
Set the Number of time blocks to 2.
1. from 06:00 to 19:00
2. from 19:00 to 06:00 the next day

Assume that charging the vehicle takes 4 hours. In the EcoSwitch settings, we call this “Duration switched on”.
At “Duration switched on” you can fill in a duration for each time block. In the first time block the car is not present. The duration is 0. For the second time block, fill in 4 hours. Like this:
During time block 1: 0:00
During time block 2: 4:00

Example: switching on a device three time per day
Let’s assume you divide the 24 hours in three parts of equal length. In each part (of 8 hours) you want to EcoSwitch to be switched on for 30 minutes, when energy prices are lowest.
In that case, configure 3 time blocks (0-8, 8-16, 16-0):
1. from 00:00 to 08:00
2. from 08:00 to 16:00
3. from 16:00 to 00:00 the next day.
At “Duration switched on ” fill in 0:30 for each time block. Like this:
During time block 1: 0:30
During time block 2: 0:30
During time block 3: 0:30
Maximum number of six time blocks
The maximum number of time blocks you can use is 6. Currently, it is only possible to specify whole hours to set the start times and end times of time blocks. (Durations however can be specified in minutes.)
Note:
Make sure that a time block that extents into the next day (for example from 16:00 to 5:00) always starts after 14:00. This is because the energy prices of the next day will be available after 14:00. If a time block starts after 14:00, the EcoSwitch will have the prices of the next day at its disposal, and will be able to create a correct plan or schedule.
Electrical power price data
The EcoSwitch can assist you to use power when the energy price is lowest. The energy prices vary per day and hour, depending on the weather (solar radiation and wind) and other circumstances. The switch retrieves the expected energy prices from the Ecosoft server, to create a power consumption plan based on these numbers. If this server cannot be reached, or if the price data is unavailable for another reason, the average values will be used, based on historical price data. In that case, an optimal planning is not possible. Therefore it is important that the switch can connect to the Ecosoft server via a WiFi connection.
In the web interface of the EcoSwitch you can see if price data has been retrieved from the Ecosoft server. Press Energy Planner.

In the Energy Planner you will see the price data is available, for example “Price data available for today and tomorrow”.
Energy Planner example with a close in boiler (kitchen boiler)
Let’s say the boiler is only used two times a day for hot water, in the morning at about 7 am and in the afternoon at about 7 pm. In this case, we set up two time blocks. Set the number of time blocks to 2.
Fill in the Time block 1 and Time block 2 fields. The first runs from 7:00 to 19:00 and the second from 19:00 to 7:00 the next day.
Let’s say heating the tap water in the boiler takes 2 hours at maximum. In the planner we call this Duration. For both time blocks, fill in a duration of 2 hours.
The page of the Energy Planner looks like this:
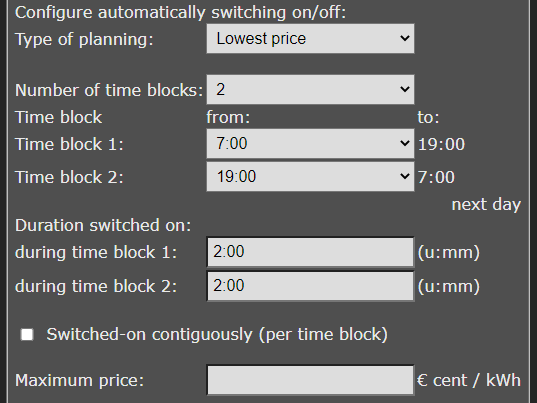
The EcoSwitch will be switched on during the 2 cheapest hours of each time block.
You can configure up to 6 time blocks. When there is a time block that runs into the next day (for example from 16:00 to 5:00), make sure this time block always starts after 14:00. This is recommended because the newest energy prices become available not earlier than 14:00.
It is important that the EcoSwitch is able to connect (via WiFi) to the Ecosoft server, to regularly fetch energy prices. If this server cannot be reached, or if the price data is unavailable for another reason, the average values will be used, based on historical price data.
You can switch on/off the EcoSwitch manually with the physical button or via the menu in the web browser. After doing so, the switch will remain in this state until the next automatic action (switch on or switch off) performed by the Energy Planner.
Information Pages
Events
The EcoSwitch registers switch-on and switch-off events, and when the energy plan is adjusted. To view this information, go to the main menu, choose System and then choose Events.
On default, the most recent events will be at the top. Use the arrow buttons to browse to next or previous events.
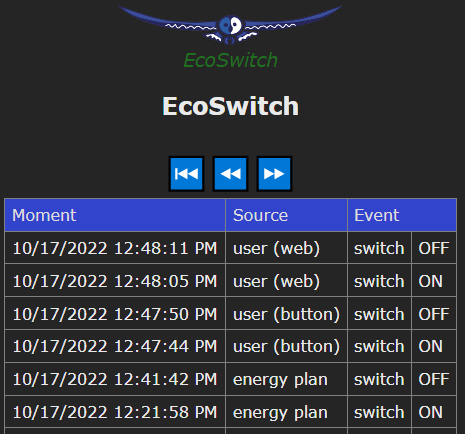
The list shows by whom the switch has been operated: by the user (via the web interface or via the button on the device itself) or by the automated Energy Planner.
Energy Use
This option only applies to the EcoSwitch Plus. The EcoSwitch Plus records how much power has been consumed. To view this information in detail, choose System from the main menu, and then Energy Use.

At the top of the page the current time is displayed, together with the current Voltage, Current and Power. When the switch is turned off, nothing will be measured. The power consumption in kWh is displayed as well.

Note: these measurements are not suitable for billing purposes or any comparable ends.
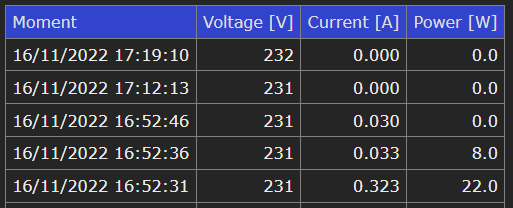
In the second part of the screen a table is displayed, showing the history of the collected energy data. To save space, only significant changes are recorded and displayed. This means that there has not been detected any significant change in current or power from a certain recorded moment to the next recorded moment. To create this table, measurements are made every 5 seconds.
Use the arrow buttons to browse to next or previous moments.
Problem Solving
The EcoSwitch is not accessible in the network
Check if WiFi is still working and its signal is strong enough at the site where the EcoSwitch is located. To reset the WiFi settings of the EcoSwitch, please follow the installation procedure (press the ON/OFF-button 6x times) as described here.
The EcoSwitch doesn’t respond to the ON/OFF-button anymore
Unplug the EcoSwitch from the socket, and plug it in again. If the device still doesn’t respond, it is probably defective.
The LED of the EcoSwitch is blinking. What does that mean?
A blinking LED means that the EcoSwitch is attempting to connect to the WiFi network.
It may also indicate that the EcoSwitch has become a WiFi Access Point. If that is the case you can connect directly to the switch to set up the network configuration. (This is used during installation. After installation, the switch is accessible via your WiFi network.)
Resetting the EcoSwitch WiFi settings and the EcoSwitch password.
Hold the button on the EcoSwitch for 40 seconds.
Other information
Access to open-source code
The EcoSwitch uses open source programs. If you want access to the source code, you may send a request to Ecosoft.
Ecosoft Energy App
Introduction
The EcoSwitch can be operated from any smart phone with a web browser, like iPhones and Android phones.
The free Ecosoft Energy App for Android is optional. With this app you can:
● View the current energy prices
● Choose the best moment to consume energy
● Configure and operate all EcoSwitches in your network
● Configure and operate other Ecosoft devices in your network
Download the Ecosoft Energy App from https://play.google.com/store/apps/details?id=nl.vidicode.ecosoftenergieplanner
Ecosoft Energy App – The menu
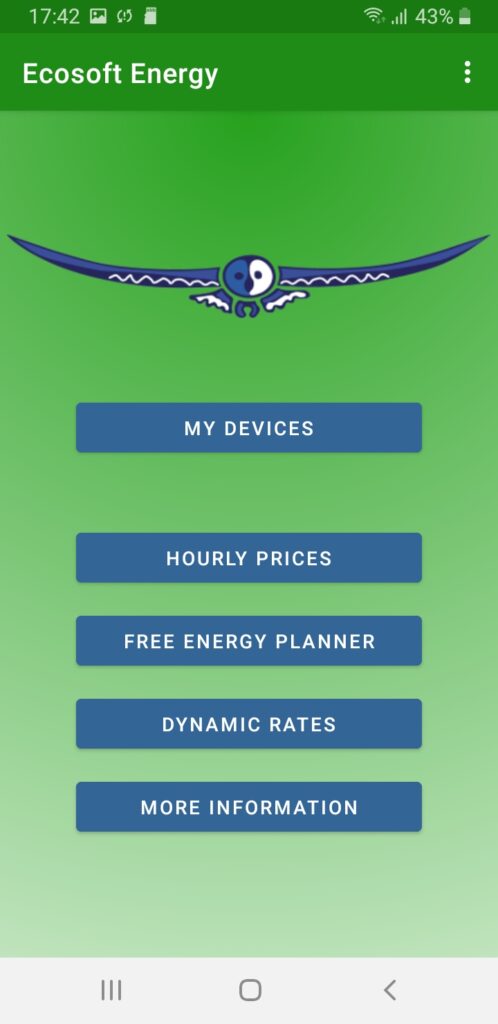
The menu options of the app are:
My Devices
Configure and operate your EcoSwitches and other Ecosoft Devices easily from this page. (Note: You can also access the web interface of Ecosoft devices via a web browser.)
Hourly Prices
History of the hourly tariffs
Free Energy Planner
You can use the planner to find the best moment to consume power, even if you don’t have an EcoSwitch.
Dynamic rates
About the dynamic energy contract, which is necessary to benefit from price fluctuations.
More information
Link to www.ecosoftenergy.com
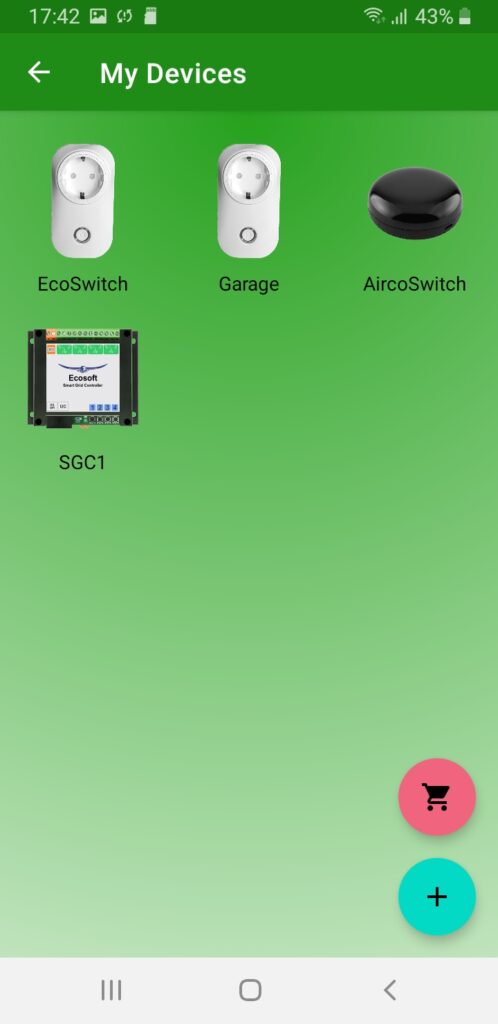
Ecosoft Energy App – My Devices
You can access your EcoSwitches and other Ecosoft devices via a webbrowser, without the app, and even in that case you will have access to the full functionality. But with our app, you can create a handy list to manage all your Ecosoft devices.
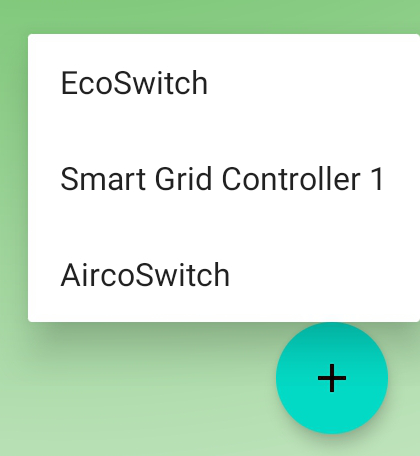
Add an Ecosoft device to the app
On the My Devices page you will find a list of all EcoSwitches and other Ecosoft devices that your app has access to.
Install the EcoSwitch as described in the chapter “Install”. Check if the web interface of your EcoSwitch is accessible via the IP address (or .local address) and if the username and password are correct.
Then you can add the EcoSwitch to the list of the app. Press the + symbol and choose EcoSwitch.
Fill in the following information of the switch:
● Device name
● Network address (IP address)
● EcoSwitch username
● EcoSwitch password
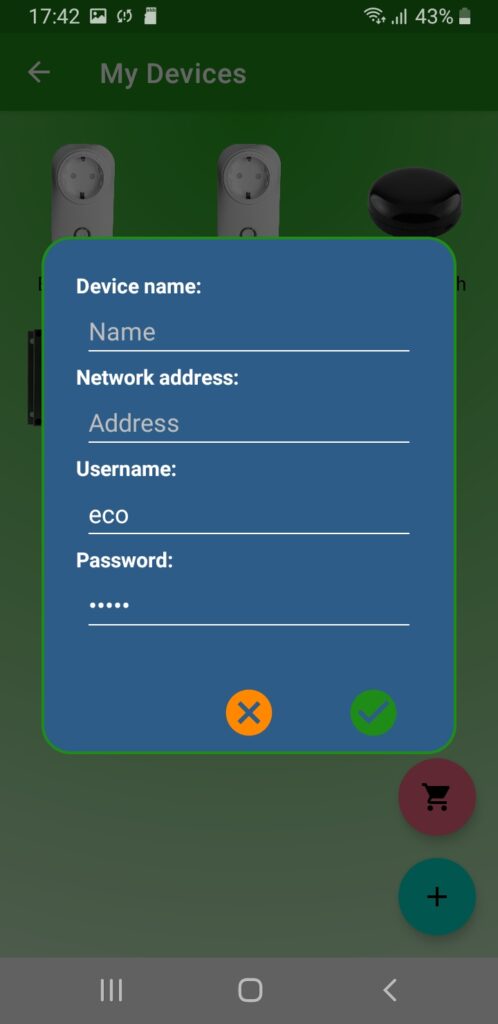
If you fill in the username and password here, the app will log on automatically to the EcoSwitch when you click (or press) on the icon of the switch. These icons are on the My Devices page.
When the list is completed, you can manage all EcoSwitches and other Ecosoft devices at your location using the app.
Accessing an EcoSwitch via the app
Press on the icon of the EcoSwitch to go to the web interface of the switch. In the EcoSwitch web interface, you can adjust the planning of the switch and change other settings of the switch. If you don’t have the Ecosoft Energy app, you can access the switch via a web browser.
Ecosoft Energy App – Hourly Prices
View the current energy prices
Energy prices are fluctuating constantly. Every day the application receives new prices and you can check when they are high or low. You will find these tariffs at “Hourly Prices”.
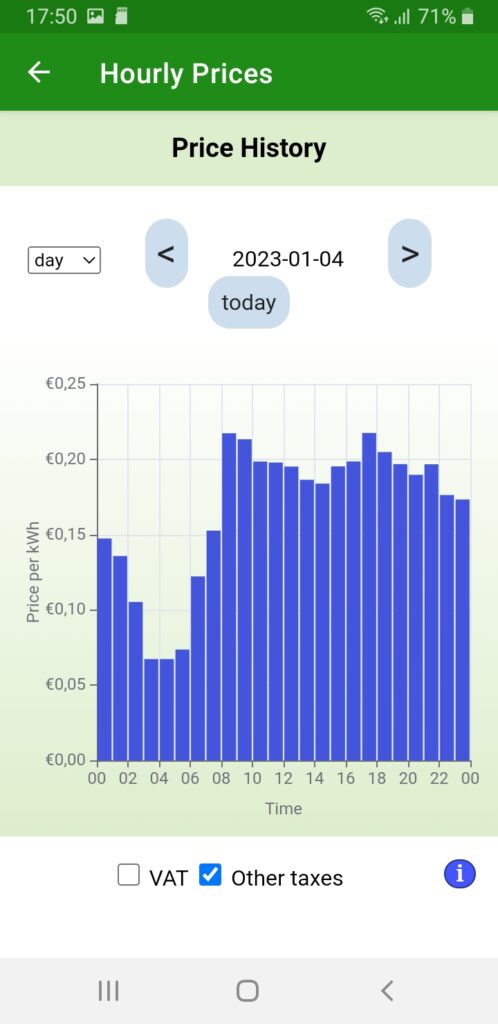
This page is also available via Price History.
Ecosoft Energy App – Free Energy Planner
The Free Energy Planner is also available at https://www.ecosoftenergy.co.uk/energyplanner/
If you don’t have an EcoSwitch, this Free Energy Planner is an alternative to determine when the energy price is lowest in the next hours. (An EcoSwitch can automatically calculate this daily, and switch on and off your electrical device automatically.)
The settings of the Free Energy Planner are:
● For how long do you need to use power?
● When must power usage be finished?
● With what time steps can you delay start your device?
The time-step option is used this way: If an electrical device supports a delayed start, let’s say a delay of 0:15 and multiples of 0:15, set the time-step to 0:15. Is a delay of multiples of 1 hour supported? Set the time-step to 1 hour.
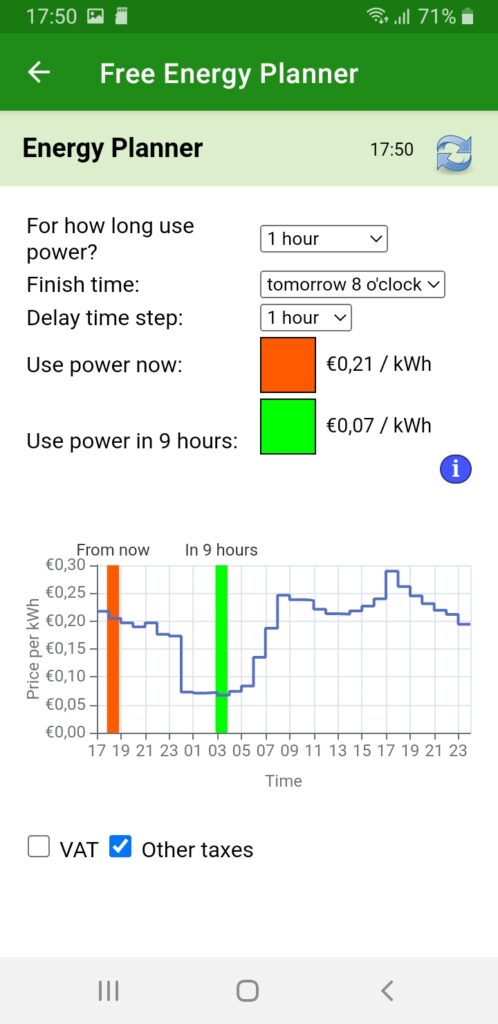
After you completed the setup, the result will show on the web page.
The dark green or even red bar shows the costs when you don’t plan at all, but start to consume energy right away. The light green bar shows the costs when you follow the advices of the Free Energy Planner. It will also show the percentage of the price you save.
With this tool you can reduce costs and CO2 emission right away.
